You’ve been invited to a bachelorette party, and while your larger-than-life ‘fro is a magnet for compliments, you want to try something different and surprise your friends. Enter the silk press, a temporary straightening process every naturalista turns to when they want to switch up their style. Though silk presses are popular because they give curly-haired girls the chance to try something new, they can be quite pricey—ranging anywhere between $55 to $150—depending on your stylist. If you don’t want to dole out that much cash, the process is simple enough that you can do it at home. We’ll walk you through how to do a silk press at home and make it look like a professional did it.
How to Do a Silk Press at Home Like A Professional

•
Published Dec 16, 2021
PureWow editors select every item that appears on this page, and some items may be gifted to us. Additionally, PureWow may earn compensation through affiliate links within the story. All prices are accurate upon date of publish. You can learn more about the affiliate process here.
How do you do a silk press?
Though the finished results of a silk press look sleek and beautiful, as with anything concerning natural hair, the process can be long and require some finesse to get it right, so make sure you have ample time before you get started.
Step 1. Thoroughly cleanse your hair
Before you add any heat, you want to make sure that you have a clean canvas to work on. Use a clarifying shampoo such as TPH by Taraji Honey Fresh Clarifying Shampoo or Pantene’s Pure Clean & Clarify Silicone-Free Shampoo to get rid of product build up that can get in the way of your silkiest finish.
Step 2. Don’t forget to deep condition
Deep conditioning is a must on a regular wash day. But when you’re preparing to expose your hair to heat, it’s especially important. “Having hair that is properly moisturized via shampooing and deep conditioning helps prevent reversion and swelling of the hair in the days following a silk press,” explain the pros at Design Essentials. A conditioner such as Mielle Organics Babassu & Mint Deep Conditioner with Protein or Mixed Chicks Deep Conditioner is rich in strengthening proteins and will help detangle your tresses to prevent snags or breakage.
Step 3. Prep your hair
Right about now, you may be asking yourself if washing and deep conditioning don’t already count as prep. And yes, of course they do. But you also have to take some additional steps when getting ready to add heat to your hair—namely, you’ll need to use a heat protectant. These products are made specifically for the purpose of shielding your hair from the damaging effects of heat such as dryness, breakage and the scariest of all, a ruined curl pattern. While Cantu Shea Butter Thermal Shield Heat Protectant and Mielle Organics Mongongo Oil Thermal and Heat Protectant Spray are wildly popular among naturalistas, there are slew of other products you can choose from based on your needs.
In addition to applying a heat protectant, you also want to make sure you utilize a good leave-in conditioner. We may sound like a broken record, but it cannot be said enough—well-nourished hair will withstand the heat better and also hold your silk press longer. We recommend the tried-and-true Shea Moisture Strengthen and Restore Leave-In Conditioner.
Step 3. Blow dry
Once you’ve applied your protectant and leave-in, it’s time to bring the heat. Part your hair into small, even sections and blow dry. For this step, you can keep it old school and use a blow dryer and a round brush. Or you can invest in a hairdryer brush, so you don’t have to juggle the brush and blow dryer at the same time. (The Revlon Hair Dryer Brush is a cult favorite that you can often find on sale.)
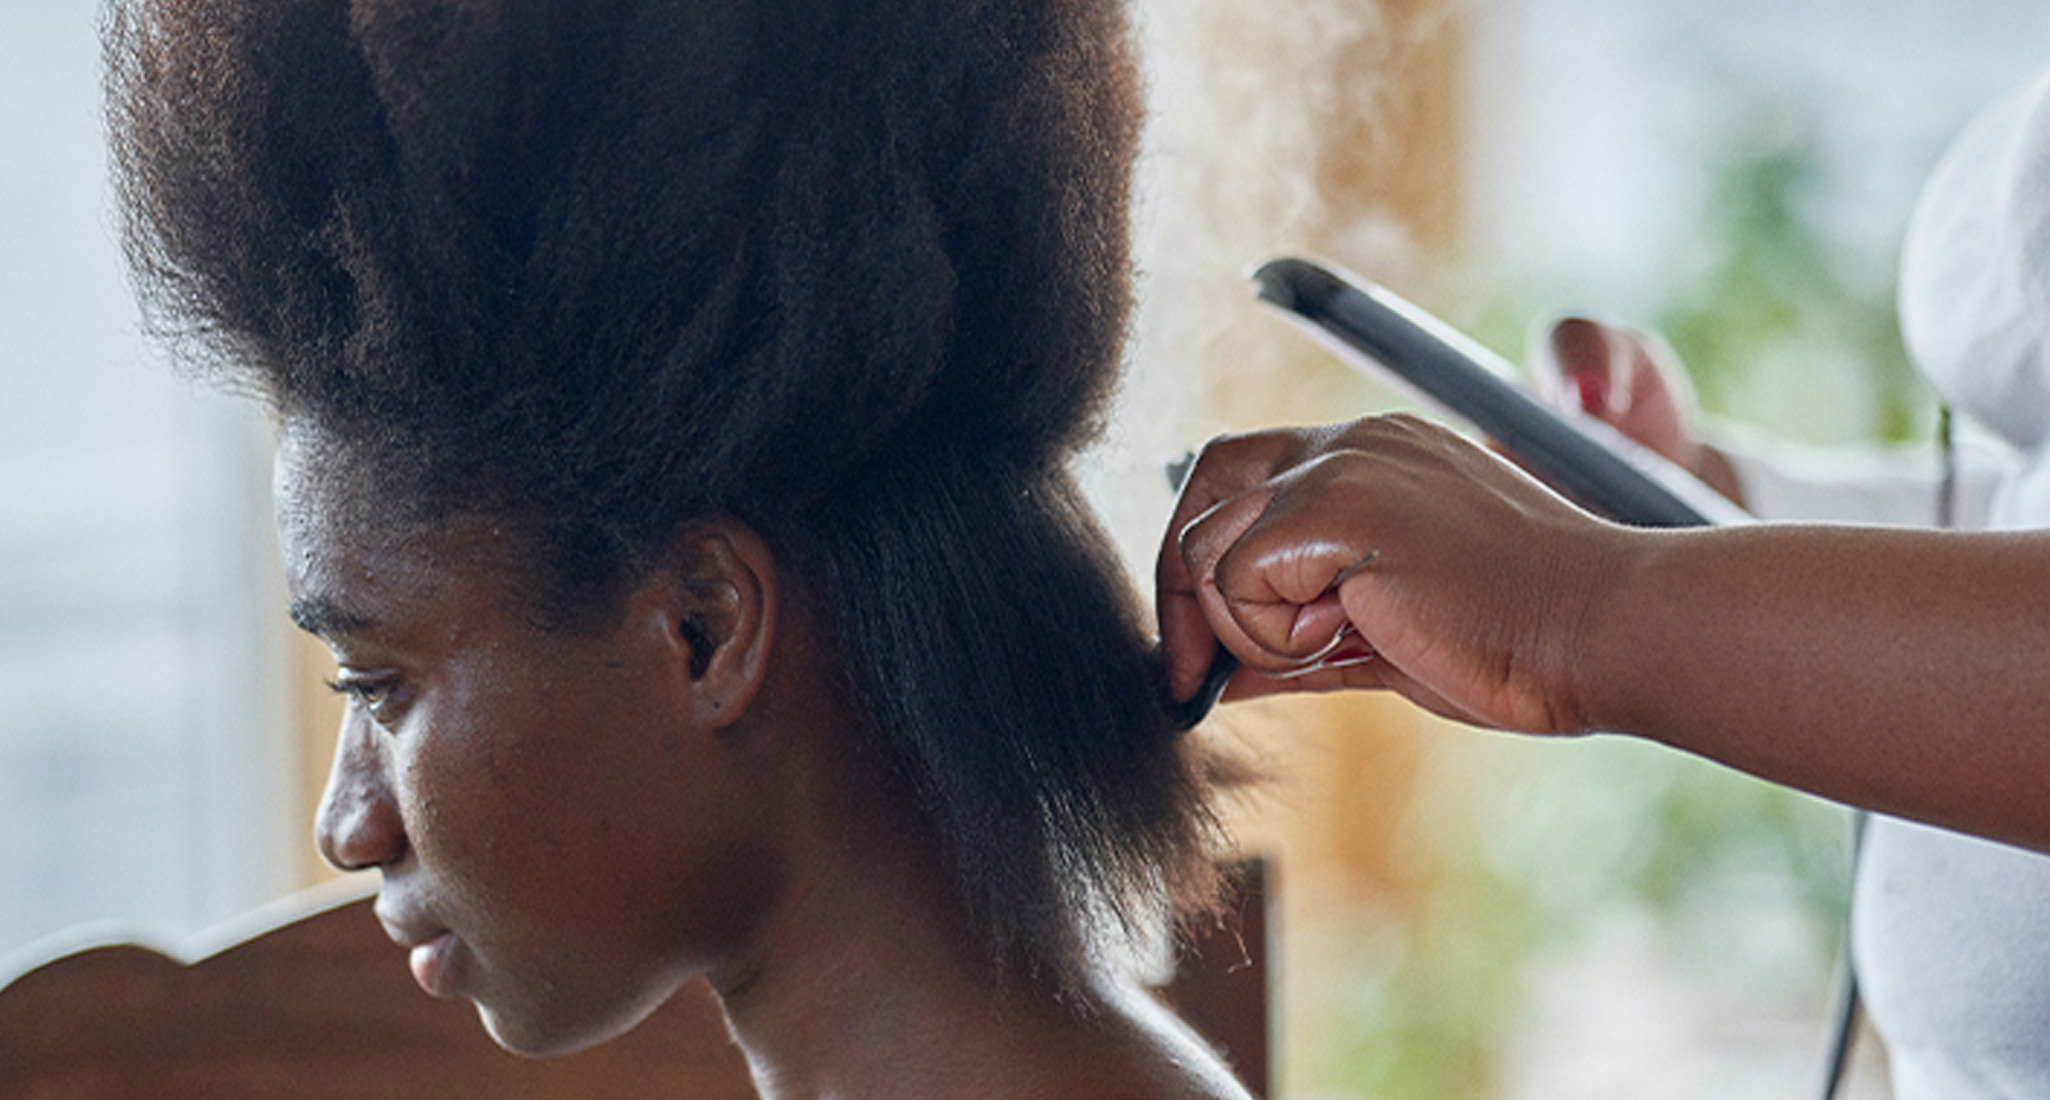
Step 4. Straighten your hair
Before you start pressing, make sure your hair is completely dry. Applying heat to moist hair will fry your strands, leaving them frayed, frizzy and damaged.
In order to straighten your hair to silky perfection, the pros at L’Oréal recommend you press in one-inch increments of hair. Starting at the root, slowly pass the iron through each section until it’s the texture you desire. Note that too many passes on one section can actually cause damage to your hair, so your best bet is to go slow and steady with fewer passes. Shopping for the right straightening iron can be overwhelming with all the choices that are available. If you need some guidance here, we'll point you to the HSI Professional Glider, which has amassed a whopping 76,326 reviews on Amazon, with naturalistas from everywhere raving about the tool.
Step 5. Wrap it up
Once your tresses are nice and straight, apply some hair spray for additional sheen and hold. Do this by spraying it liberally onto your palms, then running them down the shaft of your hair. Spraying directly onto your head will dampen your hair and, as we’ll explain below, moisture is the enemy for a silk press.
Protecting your silk press
“A good silk press will last anywhere between one to two weeks,” says Brittany Johnson, a stylist at Mayvenn Hair. To get there, you have to be extremely vigilant in taking care of your hair. Some useful tips below:
1. Wrap your hair at night
Even if you’re exhausted from that wedding you pressed your hair for in the first place, you must wrap it up if you want to keep your silk press bouncy and full-bodied. This will keep your hair from getting frizzy when you toss and turn in your sleep. Start by creating a deep side part. Next, brush your hair in a circular motion going clockwise, until you’re back where you started, securing the wrap in place with bobby pins if necessary. Afterwards, use either a satin head wrap or a bonnet to make sure everything stays in place. To see this in action, here’s a full tutorial.
2. Avoid getting your hair wet
As previously mentioned, water and silk pressed hair do not mix, so avoid getting your hair wet at all costs. That means staying out of the rain and minimizing your exposure to sweat or steam of any sort. If you feel like your hair needs some added moisture, you can apply some oil before you go to bed. Again, it’s better to put the oil on the palms of your hands before rubbing it onto the mid-lengths and ends.
3. Do not reapply heat
When you’re nearing the end of that second week, it may seem like a good idea to run a couple of passes with your straightener to get those pesky strays to lie down. However, in order to avoid damaging your hair, Johnson advises that you don’t add more heat. If you find that your hair is reverting, it’s safer to just go back to your coils until the next time you want to rock a silk press.